Navigating in the image (slicing), viewing the changing values of the pixels and the Window & Level picture.
.jpg)
There are three ways to perform the slicing operation of DICOM images, two of them are slow which ensures greater accuracy and a faster, scroll mouse, the arrow keys and right mouse button. All operations are done slicing and only in the current renderer renders the Axial, Sagittal and Coronal. The current yield is that its border is highlighted in light blue. In the figure above the current yield is the 3D rendering.
Scroll Mouse


The mouse wheel has stages that are noticeable in the use of your scroll. Each stage of the scroll can move the number up a slice, if scrolling up, or a number below for the scroll down. This ensures a good precision in the movement of the slices as they are moved one by one according to stages of the mouse scrol are being achieved. This requires positioning the mouse pointer over the yield on which pretent handle, rotate the mouse wheel up or down to move the slice number above or below respectively. The picture above shows the mouse positioned over the fou Axial yield was rolled and scrol down five stages, which resulted in moving the slice from 170 to 165.
Arrow keys
The arrow keys and the mouse wheel, allow a more precise movement of the image slices, but its method of use is different from the use of the scroll. Their use in the current renderer handles rendering the other two. You must position the mouse pointer over the yield on which pretent handle, but outside the range of the image so that no operation is made, only to surrender takes effect. With the surrender active (highlighted light blue), use the up and down arrows to move the horizontal line and the left and right arrows to move the vertical line.
.jpg)
As the above figure, the mouse pointer was positioned in the coronal yield in an area outside of the range image and was given one click to the surrender to stay active. It was down arrow 5 times the horizontal line in dark blue which represents the edge of the Axial yield, was moved up and surrender itself was also busy Axial slice of the number 165 to number 170. Similarly, we used the left arrow 5 times, the red vertical line that represents the edge of surrender Sagittal, was moved to the left and the surrender itself was also busy Sagittal slice of the 256 to 251.
Right Mouse Button
![]()
The right mouse button is used for rapid movement between the slices, very useful for large images. Clicking the right mouse button on an image to hold, drag the mouse up and down to move quickly slices.
.jpg)
In the figure above the mouse pointer was positioned over the sagittal surrender, the image was clicked and the button was pressed. With a small drag the mouse down, the slice image was moved from the slice 251 to slice 500.
Viewing the image pixels
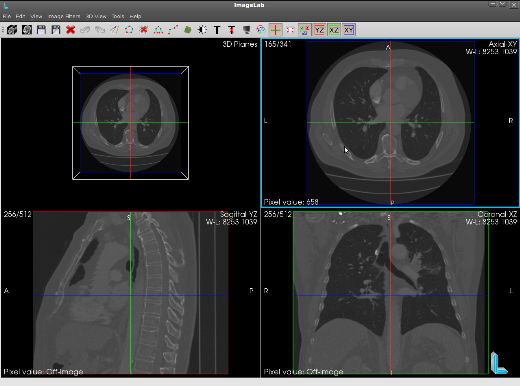
All pixels of an image have a value. The value of the pixel information is presented in so-called “Pixel value” which is available at the bottom left of each rendering and is highlighted in yellow in the figure below.
.jpg)
The values of each pixel are displayed on the surrender without pressing any button on the mouse, just by moving the mouse pointer. While browsing the pointer over image, the “Pixel value” will be instantly updated. When the mouse is not the image information “Off-Image” is displayed. As the figure above, the mouse is positioned over the image on Axial yield. The pixel where the mouse pointer is positioned has the value -970 and this value is shown highlighted in yellow in the surrender of Axial. Coronal and sagittal in renders, as the mouse is outside of your images, the information is presented Off-Image in the area highlighted in yellow in their renders.
Changing Window & Level picture
.jpg)
There are two ways to change the Window & Level of images: Using a dialog box or using the mouse itself. Information Window & Level image is available in the upper rightof each render and the image above is highlighted in yellow.
Window & Level by Dialog
.jpg)
As shown above, the icon highlighted in yellow box opens diálodo for handling theWindow & Level. Simply drag the horizontal bar laterally or edit box on the right, which automatically Level Window & the image will be updated.
Window & Level using the mouse
.jpg)
You can manipulate the Window & Level more dynamic than using the dialog box shown above, and this is possible using the right mouse button with the help of the modifier key “shift”. Holding the “shift” button, click on any image renders in Axial, Sagittal and Coronal and also hold down the right mouse button. By moving the mouse to “shift + right mouse button” pressed, moving the mouse horizontally and the Window is manipulated by moving the mouse vertically to the Level is handled. As the mouse can move diagonally, when this happens, both will be handled Window & Level. The figure below shows an image with a configuration of Window & Level different from those shown above.
